
Introduction
You can grow real food without a patch of dirt to your name. Straw bale gardening lets you raise vegetables right on a driveway or a patio. It works on a gravel lot too. It even works where the soil is too poor or polluted for a normal bed. The bale itself becomes the garden, so you skip the digging and the bad ground. This guide walks you through the whole life of a bale. You will learn how to choose one, condition it, plant it, water it, fix problems, and reuse it at the end.
Here is the part that makes the method work so well for beginners. Once you condition a bale, it holds about 40 gallons of water. It then feeds your plants like a deep container, all without a frame or fill dirt. Land grant Extension programs at Clemson and Alabama have tested the steps and put them in print. So this is not a backyard rumor. The one rule you cannot rush is conditioning. It takes about 10 to 14 days before a single seed goes in.
Cheap and easy is the usual pitch for this method, and it leaves out the parts you actually need. So this guide gives you the real cost per bale. It tells you when to start based on your climate and frost dates. And it shows you what to do when a bale runs hot or slumps into a soggy heap. You get clear numbers, real timing, and plain fixes for the days things go sideways.
Think of this as the easiest raised bed alternative you can try. There is no heavy lifting and no wood to cut. That makes it true accessible gardening for sore backs, small spaces, and first time growers. Start with the right bale and a few weeks of conditioning straw bales. Then you can build a working straw bale garden almost anywhere the sun reaches.
How To Condition Straw Bales
A fresh bale is just dry straw, and dry straw cannot feed a plant. Conditioning straw bales fixes that by waking up the bacteria and fungi that break the straw down from the inside. Water plus a nitrogen source feeds those microbes. As they work, they kick off the decomposition that turns the bale core into a soft bed for roots. The Journal of Extension points to this same chemistry as the reason a bale can grow plants at all.
The whole process runs about 10 to 14 days. Soak the bale for the first three days so water reaches the center. On day 4 you start the nitrogen and add lime, and this is where the high nitrogen fertilizer earns its keep. Synthetic gardeners reach for urea (46-0-0) or ammonium sulfate (21-0-0). If you skip synthetics, blood meal, bone meal, and fish meal all work, and Extension sources list them as fine swaps. You halve the nitrogen rate late in the schedule, then finish with a balanced feed like 10-10-10 or 8-8-8.
Here is the bale conditioning schedule I follow. Both feed options sit side by side. Pick the one that fits how you garden.
All that microbe activity throws off real heat. The bale internal temperature climbs fast during the middle days and can push past 125°F (52°C) at the core. That heat is the point, but it is also a trap. Plant too soon and you cook tender roots the moment they reach the hot center. Wait until the bale cools to roughly 99°F (37°C) or below before you set in a single seedling.
My first wheat straw bale sat in the sunny gravel strip beside the garage steps, and on day 6 it was steaming in the morning air. I pressed a hand to the side and pulled it back fast. The straw was hot, not warm, and far too hot to trust with a tomato. I left it alone and kept it damp. A few days later I pushed a finger deep into the core and felt only a mild, even warmth, like bathwater going cool. That bale was ready, and the finger told me long before any date on the calendar would have.
Straw bale gardening can have many advantages and few disadvantages if done correctly.
Choosing And Placing Your Bales
Think of a straw bale as a self-contained raised bed you buy instead of build. You skip the lumber, the screws, and the truckload of soil. The choices that decide your whole season happen before you ever plant a seed, and the first one is what to buy and where to put it.
Start with the straw vs hay question, because people get it wrong and pay for it all summer. Straw is the dry, hollow, golden stalk left after a grain crop is harvested, so it carries almost no seeds. Hay is cut green and packed with seed, so a hay bale sprouts grass and weeds straight through your vegetables. Wheat straw bales are the pick here. Pine straw is the other trap, since pine needles resist breaking down and never soften into a rooting medium.
Choose Wheat Straw, Not Hay
- Straw: The dry, hollow, golden leftover stalk of a grain crop such as wheat, harvested after the seed heads are removed, which makes it nearly free of weed seeds.
- Hay: A leafy forage crop cut while still green and full of seed, which means a hay bale will sprout grasses and weeds right through your vegetables.
- Pine straw: Skip it for this method because pine needles resist decomposition and will not break down into a soft rooting medium during conditioning.
Find A Full Sun Spot
- Sunlight: Pick a site that receives at least 6 hours of direct sun each day, since the crops that thrive in bales are sun loving vegetables.
- Surface: Bales can sit on concrete, asphalt, gravel, packed dirt, or sand, which is exactly why the method works on driveways and patios.
- Drainage: Avoid low spots that pool water, because a waterlogged base slows decomposition and can rot the bottom of the bale prematurely.
Set Bales Up The Right Way
- Orientation: Place each bale with the cut or rough stems facing up so water and nitrogen soak down into the straw during conditioning.
- Strings: Leave the binding strings or wire in place because they hold the bale together as the inside softens and decomposes.
- Permanence: Decide the layout before conditioning, since a wet, decomposing bale becomes extremely heavy and is almost impossible to relocate later.
Block Weeds From Below
- Barrier: On bare ground, lay cardboard or several sheets of newspaper under each bale to stop grass and weeds growing up through it.
- Spacing: Leave a comfortable walking gap between rows so you can reach every side of every bale for watering, planting, and harvest.
- Stability: Butt bales snugly against each other in a row so they support one another as they slowly slump over the season.
Never substitute a hay bale to save money. Hay carries thousands of weed and grass seeds that will sprout straight through your crops and turn the bale into a weeding nightmare.
Two more details lock the setup in. Set the bale with the cut, rough stems facing up so water and nitrogen soak straight down through the straw. And treat the spot as a permanent location. Once a bale starts to decompose it soaks up water and turns very heavy. Try to move it then and it falls apart in your hands.
Get the full sun, the wheat straw, and the bale orientation right now and the hard part is behind you. Place your bales at least 2 weeks before you plan to plant, because that gap is where conditioning begins. That step turns a dry bale into a living growing medium, and it is what we cover next.
What To Grow In Straw Bales
Last August my row of 4 wheat straw bales was buried under cucumbers and bush beans. The bales sat in the gravel strip beside my garage. I picked a full colander every other morning. The vines kept spilling off the sides faster than I could give the harvest away. The determinate tomatoes I planted beside them stayed tight and upright all season. A sprawling type I tried in that same spot the year before flopped over and rotted in the straw by July.
Crops win or lose in a bale by their habit, not by luck. Compact, fast, shallow rooted plants thrive in the small straw volume. Tall, top heavy, or deep rooted ones fight for support and room. That one rule sorts almost any plant into a yes or a no.
The best vegetables for straw bales come with real numbers, not vague tips. Extension data from Alabama and Arkansas gives you a clear plants per bale count for each crop. So you can plant the right amount instead of guessing. The crop cards below pair those figures with how each plant grows in straw.
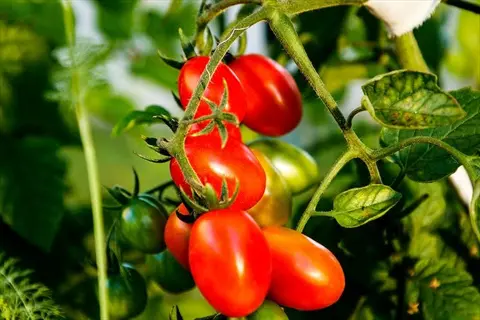
Determinate And Dwarf Tomatoes
- Density: Plant about 2 per bale so each has room for roots and airflow in the limited straw volume.
- Why it works: Bush or determinate types stay compact and do not topple the way large sprawling indeterminate plants do.
- Support: Add a short cage or stake at planting since a conditioned bale offers no firm anchor for heavy fruit.
- Timing: Set in transplants after the bale has cooled, treating it like a warm raised bed that gives an early start.
- Feeding: These are hungry plants, so they benefit most from a freshly conditioned, nutrient rich bale.
- Harvest: Expect a concentrated crop, which suits canning and batch cooking from just a couple of bales.
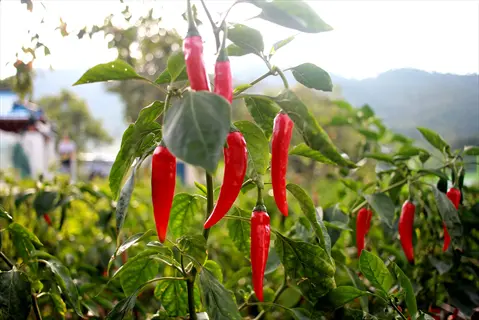
Peppers And Eggplant
- Density: Plant about 3 peppers or 2 eggplants per bale to balance sunlight and root space.
- Why it works: Both are upright, manageable plants that love the warmth a decomposing bale provides at the roots.
- Warmth: The gentle heat of an active bale suits these heat loving crops and can speed early growth.
- Support: Stake taller pepper and eggplant varieties since wind can rock plants loose in soft straw.
- Watering: Keep moisture steady, as swings between bone dry and soaked stress the developing fruit.
- Harvest: Pick regularly to keep plants producing through the warm part of the season.
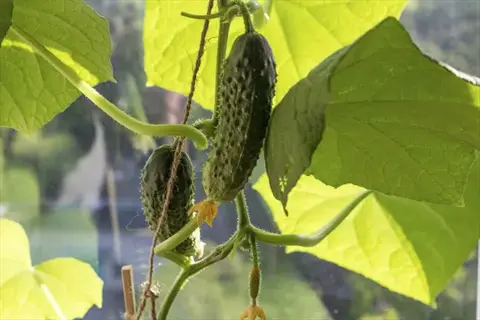
Cucumbers, Squash, And Beans
- Density: Plant cucumbers 4 to 6 per bale, squash 2 per bale, and bush beans about 9 per bale.
- Why it works: These fast, productive crops use the loose straw and steady moisture to grow quickly.
- Vining: Train cucumbers and vining squash up a trellis to save space and keep fruit clean.
- Beans: Bush beans fix their own nitrogen and crop heavily, making them a reliable beginner choice.
- Watering: Squash and cucumbers are thirsty, so watch them closely on hot days when bales dry fast.
- Harvest: Pick often, since frequent picking keeps these crops flowering and fruiting longer.
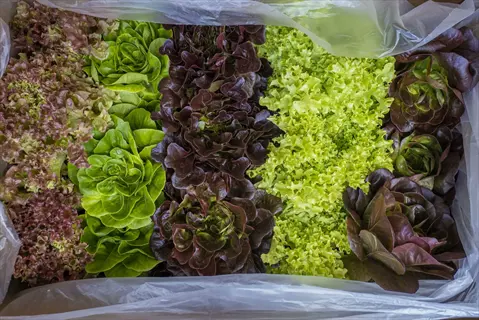
Lettuce And Leafy Greens
- Density: Plant leaf lettuce up to 9 per bale and head lettuce or cabbage about 3 per bale.
- Why it works: Shallow rooted greens thrive in the soft, moisture holding surface of a conditioned bale.
- Season: Greens suit cooler spring and fall windows, letting a bale produce before or after summer crops.
- Bale age: Greens do well in slightly older, more decomposed bales that have finished their hottest phase.
- Watering: Keep the surface evenly damp so leaves stay tender rather than turning bitter and tough.
- Harvest: Cut outer leaves and let plants keep growing for a long, steady supply of salad greens.
Match the crop to the age of the bale and you get even more from each one. A fresh bale is rich and hot. That suits hungry fruiting crops like tomatoes and peppers that want a steady feed. An older bale has cooled and broken down more. That makes it a better home for root crops and leafy greens, which like a soft, damp surface.
This is also how you stretch one bale across two harvests. Plant greens in the cool spring window. Then follow with a summer fruiting crop, or flip the order in fall. Knowing what to grow in straw bales at each stage turns one bale into a small rotation.
Avoid corn, okra, watermelon, pumpkins, and large indeterminate tomatoes, plus perennials like asparagus and rhubarb. They are too tall, top heavy, or deep rooted for the limited support and volume a single season bale can offer.
Watering And Feeding Bales
A planted bale acts like a 40 gallon (151 liter) container, so it drains and dries far faster than garden soil. The grid below sums up the core care facts. In summer heat you water daily, sometimes twice. You also give a balanced fertilizer every 2 to 3 weeks all season. Get those two numbers right and most of your watering straw bale garden worries go away.
Here is why a bale runs through water so fast. Straw is loose and airy, so it grabs moisture but lets gravity pull it straight through within hours. That is the whole point of asking how often to water straw bales, and the honest answer is more than you think. On a hot, windy day the top of the bale can feel bone dry by noon even after a morning soak.
For hot spells or a few days away, sink a milk jug or soda bottle with small holes into the bale beside each plant and fill it. It drip feeds the roots slowly so the bale does not dry out while you are gone.
The single biggest reason crops fail mid season is a bale that swings between soaked and bone dry. Roots hate that whiplash, and they will wilt, drop fruit, or rot. Steady moisture matters more than volume on any one day. Aim for damp and even, like a wrung out sponge, every single day rather than a heavy flood once in a while.
There is a hidden bonus to a wet, breaking down bale. The straw decomposes and water evaporates off the bale. That works like a swamp cooler and keeps roots cooler than they would sit in a hot plastic pot. That edge helps tomatoes, peppers, and greens push through brutal summer heat that would stall the same plants in a pot.
You do not have to stand there with a hose every day. A soaker hose or a drip irrigation line laid along the top of each bale puts water right where the roots are and saves you both time and waste. For short trips or a heat wave, the buried milk jug trick from the tip box drip feeds the roots slow and steady while you are away.
Good ongoing care is really just two habits. Check the bale for moisture each morning, and mark your calendar to feed every 2 to 3 weeks so the plants never run short. Do those two things and the bale carries your crop straight through to harvest.
Cost And Who It Suits
Let's talk money, because this is where straw bale gardening really wins over a wooden bed. The straw bale gardening cost stays low because the bale does two jobs at once. It works as both the raised bed and the soil, so you skip the lumber, the screws, and the truckload of garden mix.
The cost per bale runs about $5 to $7 in most areas. That figure comes from Clemson. Where straw is harder to find, a bale can hit $10, per University of Arkansas Extension. Add a few dollars for nitrogen to feed the bale and about a dollar for lime. You may want $1 to $3 for a little potting mix if you start small seeds. The full breakdown sits in the table below.
Here is the part that hooks beginners. For about the price of one bag of garden soil, you can start a whole bale and grow real food in it. A permanent raised bed asks for boards, fasteners, and bag after bag of mix before you plant a single seed. That gap is why a bale makes such a friendly raised bed alternative. It is also why gardening for beginners clicks so fast with this method.
So who gets the most out of it? Anyone stuck with poor, rocky, compacted, or contaminated soil, since the bale brings its own clean growing medium and sits right on top of bad ground. Renters love it because nothing gets built or dug, and the bale leaves with you. Patio and driveway gardeners can set bales on hard surfaces where a bed could never go.
The height helps too. A conditioned bale gives you a planting surface around 18 to 22 inches off the ground, so you bend and kneel far less while you tend the row. That back friendly lift makes this true accessible gardening. It helps older growers and anyone with sore knees or limited mobility.
There is a bigger reason this matters. Researchers in the Journal of Extension looked at bales as a way to grow food in dry places. In those spots the native soil just won't cooperate. Cheap materials plus full soil independence turns a bare patio into a working food garden. That is real food security for people who could not garden any other way.
Conditioned straw bales offer a versatile and affordable method of growing vegetables for gardeners with space, soil, or physical limitations.
Troubleshooting And Bale Reuse
Most straw bale gardening problems trace back to a few simple causes, and almost all of them have an easy fix. Once you know what overheating, surface fungi, and a slumping bale actually mean, you stop panicking and start reacting.
I poked at a cluster of pale mushrooms one humid week. My bale by the garage had grown a whole patch of them overnight. They came off in my fingers like wet paper. So I brushed them into the grass and watered the bale the way I always do. My cucumbers and bush beans next to it kept setting fruit, and the mushrooms never came back once things dried out.
That same calm approach is the heart of troubleshooting straw bale garden trouble. The cards below cover the failures that scare new growers, with a clear cause, a fast fix, and a way to stop the problem next time.
Plants Wilt Or Die After Planting
- Cause: The most common reason is planting too soon while the bale interior is still hot from active decomposition.
- Fix: Always check the temperature first, since a bale can exceed 125 degrees Fahrenheit (52 degrees Celsius) inside and must cool to about 99 degrees Fahrenheit (37 degrees Celsius) before planting.
- Prevent: Push a hand or a compost thermometer into the bale and wait until it feels warm and crumbly, not hot, before you set in any plants.
Mushrooms, Mold, Or Fungi Appear
- Cause: Surface mushrooms and fuzzy growth are just the fungi that help break the straw down, and they show up most in humid weather.
- Fix: Brush mushrooms off if you prefer, keep watering as usual, and they will fade as conditions dry, since they do not harm your crops.
- Prevent: Good airflow between bales and watering at the base rather than overhead keeps surface dampness and fungal growth in check.
Bale Collapses Mid Season
- Cause: As decomposition advances the inside of the bale softens and the whole bale can slump under heavy fruiting plants.
- Fix: Drive stakes into the ground beside the bale and tie the strings to them, or cage tall plants so they stay upright as the bale settles.
- Prevent: Choose dense, well bound bales at the start and leave the binding strings on so the bale holds its shape longer.
Reuse The Spent Bale
- Lifespan: A conditioned bale lasts one growing season for most growers, and a sturdy one may carry a second crop before it breaks down.
- Mulch: Spread the loose, partly decomposed straw around other plants as a moisture holding, weed suppressing mulch.
- Compost: Add the remains to a compost pile or work them into a raised bed, returning the organic matter to your garden.
One risk does not show up on those cards. It matters most if you grow food. Herbicide carryover is when weed killers ride into your garden on the straw. Sprays like aminopyralid or clopyralid hang on for months. They can stunt or twist your plants long after the bale was sprayed.
The test is simple and worth your time before you plant any edibles. Sprout a few fast bean or pea seedlings in damp straw from your bale. Then watch how they grow over a week or so.
Before planting, test for herbicide carryover by sprouting a few bean or pea seeds in damp straw from the bale. Twisted, cupped, or stunted seedlings warn that persistent herbicides may be present, so do not plant edibles in that batch.
So how long do straw bales last? A conditioned bale carries you through one full growing season. A dense, well bound one can hold up for a second crop before it falls apart. Either way, the end of its life is not the end of its value.
When the bale breaks down, you can reuse bale as mulch for your other plants. The loose straw holds moisture and smothers weeds. You can also add the remains to a compost pile or a raised bed. The bale that grew your tomatoes then feeds next year's soil.
5 Common Myths
Straw bale gardening and hay bale gardening are the same thing, so any farm bale you find will grow a healthy garden.
They are not the same. Hay is full of weed seeds and will sprout a mess, while straw is the seed free leftover stalk of a grain crop.
You can plant straight into a fresh straw bale the same day you buy it, because the straw is already a growing medium.
A fresh bale must be conditioned for about 10 to 14 days first, since the interior can exceed 125 degrees Fahrenheit and would cook tender roots.
Straw bale gardens need far less water than soil gardens because the thick straw locks moisture inside the bale all day.
Bales actually dry out fast and act like a 40 gallon container, so they often need daily watering, especially during hot summer weather.
You can grow absolutely anything in a straw bale, including corn, pumpkins, and big sprawling indeterminate tomato plants.
Tall, top heavy, or deep rooted crops like corn, okra, and pumpkins do poorly, while compact vegetables and leafy greens thrive.
Once the season ends the spent straw bale is useless garbage that has to be thrown away or hauled to the dump.
A spent bale is valuable organic matter that can be reused as mulch, added to a compost pile, or worked into a raised bed.
Conclusion
You now have the full path from bare straw to a loaded harvest. Start with a wheat straw bale, set it where the sun hits for at least 6 hours, and spend 10 to 14 days conditioning straw bales with water and nitrogen. Then plant compact crops, water and feed on a steady rhythm, fix small problems as they show up, and let the spent bale feed your soil at the end.
The numbers behind this method are friendly to beginners. A bale costs about $5 to $10, holds close to 40 gallons of water like a tall container, and gives you one good season with a shot at two. That low price and short setup are why straw bale gardening keeps drawing in home gardeners who want results without a big build or a big budget.
Keep one thing above all others. Patience during conditioning and steady watering are what split a thriving bale from a dead one. Plant too early into a hot bale and your roots cook. Skip a few days of water and the whole thing dries from the inside. Hold the line on those two habits and the rest of your straw bale garden tends to fall into place.
This is accessible gardening at its most honest. A driveway, a patio, or a patch of hard clay can grow real food this way. That makes a bale a true raised bed alternative at a fraction of the cost of lumber and soil. The method has earned its comeback through land grant Extension and peer reviewed research, so you are on solid ground. Grab a bale or two this week and start small.
Glossary
- Bioassay
- A simple safety test in which a few fast seeds are sprouted in damp straw to check for herbicide residue before planting edibles.
- Conditioning
- The 10 to 14 day process of watering a straw bale and adding nitrogen so bacteria start breaking the straw down into a growing medium.
- conditioning straw bales
- The 10 to 14 day process of watering and feeding a bale with nitrogen so it starts to decompose and turn into a usable growing medium.
- Determinate tomato
- A compact, bush type tomato that grows to a set size and ripens its fruit over a short window, making it well suited to a straw bale.
- Dolomitic lime
- A ground limestone product added during conditioning to balance acidity and supply calcium and magnesium to the bale.
- Herbicide carryover
- Persistent weed killer residue that can ride into a garden on straw and damage crops even after the straw is composted.
- Indeterminate tomato
- A tall, sprawling tomato that keeps growing and fruiting all season, which is usually too large and top heavy for a single straw bale.
- Overwintering crops
- Hardy plants like garlic that are planted in fall, survive winter in the ground or bale, and finish growing the following spring.
External Sources
Frequently Asked Questions
Can you grow plants in a straw bale?
Yes. Once a straw bale is conditioned with water and nitrogen, the decomposing straw becomes a warm, nutrient releasing medium that supports vegetables, herbs, and flowers.
When should you start a straw bale garden?
Start conditioning your bales about two weeks before you plan to plant, which usually means around your local last spring frost date.
Is straw or hay better for a straw bale garden?
Straw is far better. Hay is cut from leafy plants and is full of seeds that will sprout, while straw is the hollow leftover stalk of a grain crop.
What is the best fertilizer for straw bale gardening?
Use a high nitrogen source like urea or blood meal during conditioning, then switch to a balanced fertilizer once plants are growing.
Can you plant seeds directly into straw bales?
Yes, but seeds need a thin layer of potting mix on the bale to hold moisture, while transplants can go straight into divots in the conditioned straw.
What is the disadvantage of straw mulch?
The main drawbacks are hidden weed seeds in low quality straw, possible herbicide carryover, and a habitat for slugs and rodents if applied too thick.
What mistakes do first time straw bale gardeners make?
The most common mistakes are planting before the bale cools, skipping conditioning, using hay, and letting the bale dry out between waterings.
How long do straw bales last in a garden?
A conditioned bale usually lasts one growing season, and a sturdy bale can sometimes carry a second crop before it breaks down into compost.
What vegetables can you plant in October?
In mild climates October suits cold hardy crops like lettuce, spinach, kale, garlic, radishes, and other quick greens that tolerate cool weather.
Is October too late to plant a garden?
October is not too late in mild climates. Cool season greens, garlic, and overwintering crops can still go in, especially in raised or conditioned bales.