Houseplant · Araceae
Black Velvet Elephant Ear
Alocasia reginula 'Black Velvet'
A tiny jewel alocasia showing off velvety black leaves laced with silver veins, happiest with an attentive owner.
Bright indirect
USDA 10–12
18 in · 46 cm
Overview
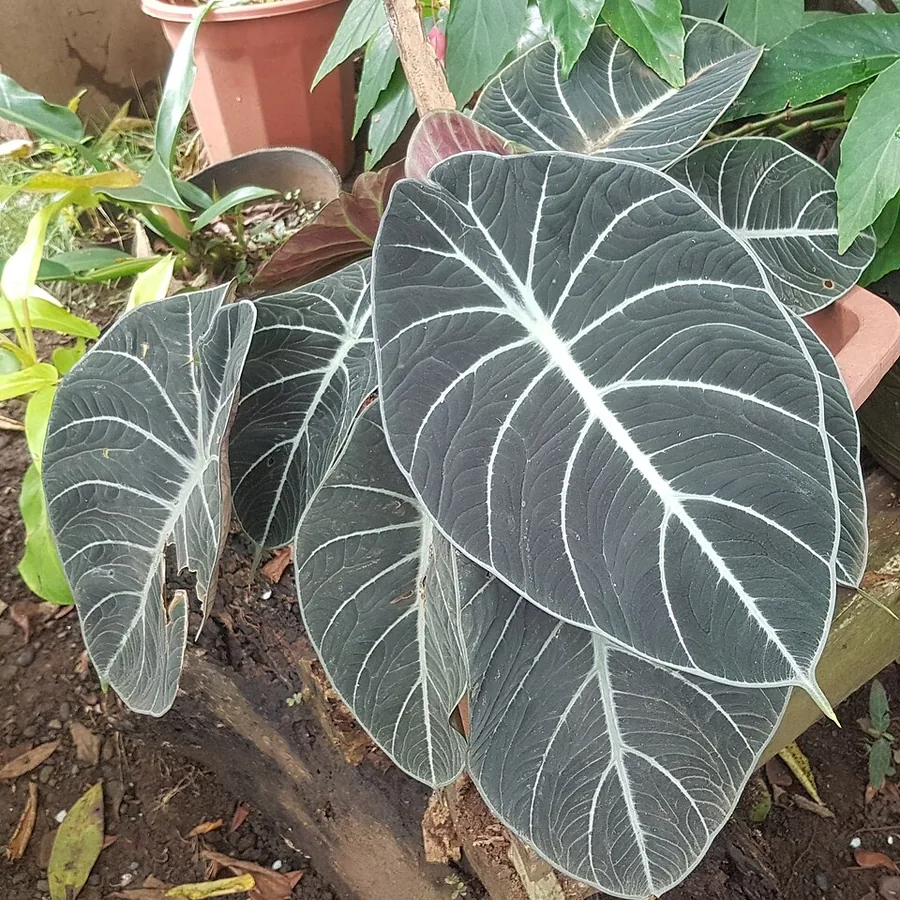
Black Velvet is one of those little jewel alocasias people fall for, thanks to its thick, almost-black leaves striped with bright silver veins. It stays small, topping out around 18 inches (46 cm), so think tabletop accent rather than the giant elephant ear you might be picturing. It's part of the aroid family and originally hails from the rainforests of Borneo.
Up for a bit of a project? This one's for you. It's a slow grower that hates the cold and starts rotting the moment its soil gets soggy, so success really comes down to paying attention and not drowning it. Nail that balance and you get dark, textured foliage that's about as eye-catching as houseplants come.
Here's something worth knowing right away: every bit of it carries calcium oxalate crystals that sting the mouth and irritate skin. It's truly toxic to pets and risky for little ones, so set it somewhere curious paws and mouths simply can't get to.
Care
The short version: bright indirect light, plenty of humidity, and steady warmth, plus watering that waits until the top half of the soil has dried out. Overwater it and you'll lose it fast.
Light
Set it in bright, indirect light, like the glow near a window but shielded from harsh midday rays that would burn those dark leaves. It'll tolerate partial shade, but skimp on light and you'll slow down an already pokey grower and wash out that velvety look.
Water
Watering is where folks lose these plants. Wait until the top half of the soil dries out before you give it more, and dial things back in winter, since this whole genus rots fast when it's left wet. And never let the pot sit in a saucer full of water.
Soil
Go with a moist but well-drained, organically rich mix that stays a little damp without turning to mush. Anywhere from 5.0 to 8.0 on the pH scale is fine, but honestly drainage matters way more than hitting an exact number, because heavy soil that traps water is what kicks off root rot.
Humidity
This plant loves high humidity, the sort of moist air you'd find on a rainforest floor. Dry indoor air wears it down and rolls out the welcome mat for spider mites, so a steamy spot, a pebble tray, or a little humidifier makes a real difference.
Feeding
Feed it while it's actively growing in spring and summer, then back off or quit entirely once winter dormancy sets in. A seasonal rhythm works best, because forcing food on a resting plant won't get you anywhere.
Pruning
No shaping needed with this one. Just pull off dead, yellowed, or damaged leaves as they crop up to keep it looking neat and leave pests fewer places to hide.
Repotting
Only repot when it's clearly outgrown things, since this cultivar dislikes being fussed with and grows slowly anyway. Spring or summer is the moment, and you can pair it with dividing if you'd like extra plants. Fresh fast-draining mix each go-round helps keep rot at bay.
Overwintering
Ahead of the first fall frost, shift pots to a humid, cool spot around 60°F to 65°F (16°C to 18°C) and water less. A freeze wipes out the leaves, but the plant can coast through winter and send up fresh ones when it warms back up.
Size & spacing
Count on a compact plant, up to about 18 inches (46 cm) tall once it's mature. Being slow and small, it slips easily onto a shelf or tabletop instead of needing floor space.
Troubleshooting
Nearly everything that goes wrong here traces back to water, humidity, or cold. Check the leaves and the soil at the same time, because one symptom might mean too much water or not enough moisture in the air. Find what matches below, then jump on it before it spreads.
Soft yellow growth that flops over while the soil still feels damp
What you're seeing is root rot, and the usual culprit is too much water in a heavy mix that won't drain. Slide the plant out of its pot and take a look at the roots, since healthy ones stay firm and pale while rotted ones go brown, black, and squishy. Back way off on watering, snip away the mushy roots and any flopped-over leaves, then settle it into fresh, gritty soil that drains in a hurry.
Fix:
- Reduce watering immediately
- Repot into fresh, gritty, fast-draining medium
- Remove rotted roots and any collapsed growth
Brown blotches showing up on leaves while the soil stays damp
Leaf spots usually turn up when the soil has been wet for too long, and NC State groups them with root rot as a sign you're watering too much. Stretch out the time between waterings, get the drainage and airflow sorted, and snip off the leaves that look worst. Want fewer spots? The trick is simply keeping that foliage from sitting damp.
Fix:
- Reduce watering frequency
- Improve drainage and air circulation
- Remove badly affected leaves
Thin webbing and a dull, speckled look spreading over the leaves
That's the calling card of spider mites, and they love to move in on houseplants once the air dries out. Flip the leaves over and look closely for the tiny mites and their webbing, which only gets worse the drier things get. Give the foliage a good rinse, bump up the humidity nearby, and keep treating until they're cleared out.
Fix:
- Rinse foliage
- Raise humidity
- Treat as appropriate for spider mites
Tacky film and little cottony clumps tucked where leaves meet stems
That's a sign of mealybugs, and sometimes scale tags along too, both of which go after plants kept indoors. Peek into the leaf joints and under the leaves for those fuzzy white clumps. Wipe away whatever you spot and treat the rest, and get into the habit of checking the plant so a few leftovers don't quietly come back in force.
Fix:
- Wipe off visible pests
- Treat infestation as appropriate
Leaves fading and dropping as the cold weather rolls in
Most of the time this is just cold damage and natural dormancy, not a goner. A freeze does take out the leaves, but in mild zones the plant pushes new growth from the base once it warms up, and potted ones can ride out winter inside. Before frost hits, move pots to a humid, cool spot around 60°F to 65°F (16°C to 18°C), go easy on the water, and let it rest until it's ready to grow again.
Fix:
- Bring pots indoors before frost to a humid, cool spot around 60-65°F
- Reduce watering over winter
- Allow the plant to rest and resume growth when warmth returns
Toxicity
Think of this as a toxic plant, plain and simple. Every part is loaded with insoluble calcium oxalate crystals, tiny needle-like shards that scorch the mouth and throat if chewed and leave skin red and itchy wherever the sap touches. Keep it far from pets, livestock, and small kids, and wash up after you've handled it.
Toxic to
Cats · Dogs · Horses · Rabbits · Livestock · Birds · People
Cats Moderate
Take one bite and a cat knows it right away. You'll likely see a burning mouth, swollen lips, tongue, and throat, lots of drooling, vomiting, and a hard time swallowing.
Dogs Moderate
Dogs get the same painful jolt from chewing on any part, so look for a swollen, sore mouth, drooling, pawing at the face, vomiting, and trouble getting things down.
Horses Moderate
Those oxalate crystals leave a horse with a sore, swollen mouth and throat, plus drooling and a tough time swallowing. Keep it nowhere near anything that grazes.
Rabbits Toxic
The crystals that hurt other animals make this a no-go for rabbits, so don't let them take so much as a nibble.
Livestock Toxic
Cattle, goats, and sheep aren't safe around it either. The calcium oxalate irritates the mouth and gut, so it just doesn't belong anywhere livestock graze.
Birds Toxic
Pet birds can be hurt by the crystals too, so keep cages and perches well away from the leaves.
People Caution
None of this plant is something to eat. A bite leaves your mouth burning and swollen, and the sap can turn skin red and itchy, so wash up after handling it and keep it out of reach of little kids.
All parts contain calcium oxalate crystals; sap can cause contact dermatitis
Helpline numbers

United States
ASPCA Animal Poison Control: (888) 426-4435 (fee applies)
Poison Control: (800) 222-1222



Canada
Poison Centres: 1-844-764-7669
How to propagate
There's basically just one dependable way to make more of these, and it asks for a careful touch instead of any fancy know-how.
DivisionModerate
Spring to summer · Several weeks
Division is your best bet, and NC State recommends splitting off the offsets to multiply alocasia. Plan it for spring or summer when the plant is actively growing. Slip it out of the pot, gently pull apart the rhizomes and offsets, give each one its own pot, and allow it several weeks to settle in and root before any fresh leaves appear up top.
Myths
If your alocasia drops its leaves over winter, that means it's dead.
Chilly weather and a natural rest period make the leaves die back, and while that can look pretty scary, it hardly ever means the plant is finished. Sure, a freeze kills the leaves, but in mild zones it bounces back from the base when warmth returns, and a potted one you've brought inside will sprout again. Let it rest and hold off before you give up on it.